

- Published on
Nest Request Lifecycle
- Authors
- Name
- Amit Barletz
- @BarletzA52


The first thing that comes into my mind when I hear the term 'Lifecycle' is that moment, in the Lion King movie, when Rafiki lifts Simba and all the animals bowed, and the music in the background "it's the circle of life..." (by the way, a few days ago I saw a post that said this movie was first published 28 years ago, and it made me feel very old).
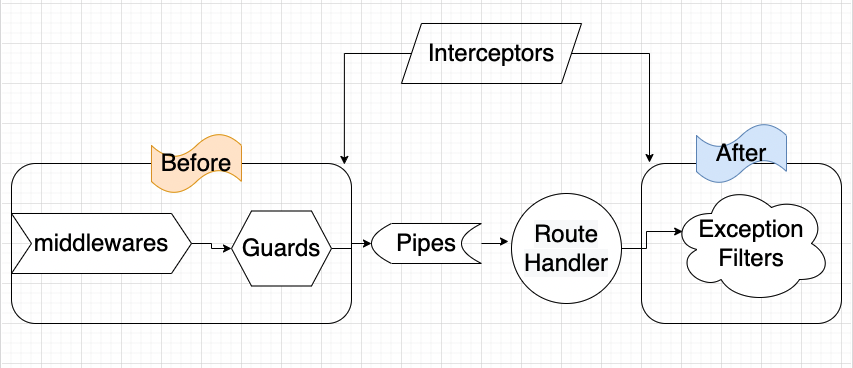
The term lifecycle in Nest (and Express) refers to something a bit different. Request Lifecycle refers to a sequence where applications handle requests and produce responses. In other words, it traces how a user’s request flows through the app.


Understanding the request lifecycle helps determine where you should write a particular code to get the desired behavior. Middlewares, pipes, guards, interceptors, and exception filters can be executed in a different places during the request lifecycle (global level scope/controller level scope/route level scope), and it can be challenging to trace down where a particular piece of code is being executed.
In general, a request flows through the middle software to the guards, interceptors, pipelines, the handler in the route itself, and finally to the interceptors in the return path (when the response is generated). If an error occurs, the exception filters are executed.

Global Scope and Injection
Middlewares, guards, interceptors, pipes, and filters can be used globally across the whole application. Regarding dependency injection, guards, interceptors, pipes, and filters are registered outside of a context of a module, for example, with app.useGlobal*() (* => Guards/Interceptors/Pipes/Filters). Therefore, they cannot inject dependencies, but we can set up the class directly from any module to solve this issue.
As to middlewares, accessing the DI container in a global middleware is not possible. What can be done is to use functional middleware instead when using app.use(), or use a class middleware and consume it with .forRoutes('*') within a module.
Don't worry, you will see it shortly with more detailed examples.
You can read more about dependecy injection on my previous article.
For this blog post I created a GitHub respository: nest-req-res-lifecycle with Amplication.
Amplication's generated app already uses most of the request lifecycle's components, such as Guards, Pipes, Controllers, Services and Exception Filters (so basically everything except Middlewares). For simplicity, I generated the sample app provided by Amplication and although we get both controllers (for REST approach) and resolvers (for graphql approach), my explanaions and examples will be on the REST approach. This will make it easier to explain, with a real-world app and straightforward approach Nest's request lifecycle.
Without further ado, let's go through the requst/response flow and explain each one.
Middlewares:
Called BEFORE the route handler and have access to the request and the response objects, and the next() middelware function.
import { Request, Response, NextFunction } from 'express'

middlewareFn(req: Reqest, res: Response, next: NextFunction) {}
If the current middleware function does not end the request-response cycle, it must call the next() function in order to pass control to the next middleware function. Otherwise, the request will be left hanging.
Middleware functions are usually used for excuting code before the route handler. For example: making a change to the request and the response objects / ending the request-response cycle calling to the next middleware function in the stack.
Implementation
To implement Nest custom middleware (and then being able to use it in the application), we need to create a class that implements the NestMiddleware interface and to benefit from Dependency Injection, we need to decorate that class with @Injectable. This makes middelwares available within the module.
import { Injectable, NestMiddleware } from '@nestjs/common'
import { Request, Response, NextFunction } from 'express'

@Injectable()
export class MyMiddleware implements NestMiddleware {
  use(req: Request, res: Response, next: NextFunction) {
    console.log('my middleware...')
    next()
  }
}
There is also a way to implement functional middelware in Nest
Application
Global Level Middleware:
If we want to bind middleware to every registered route at once, we can use the use() method with a functional middleware:
import { Request, Response, NextFunction } from 'express'

export function myFuncMiddleware(req: Request, res: Response, next: NextFunction) {
  console.log('log from functional middleare')
  next()
}
// main.ts
const app = await NestFactory.create(AppModule)
app.use(myFuncMiddleware)
Module Level Middleware (in application module or in a specific module):
To apply our custom middleware in the applicaiotion, we need to use the application module or the resource module. The module should implements the NestModule interface that has a configure() method which takes a consumer parameter (you can call it as you want) from type MiddlewareConsumer. Then, we can pass the middleware to the apply() method of the consumer and set the routes that we want the middelware to be executed on (forRoutes()), and also exclude routes that we don't want the middelware to be executed on (exclude()).
// app.module.ts
@Module({
  imports: [MyModule],
})
export class AppModule implements NestModule {
  configure(consumer: MiddlewareConsumer) {
    consumer.apply(MyMiddleware).forRoutes(MyController)
  }
}
NOTE: I mentioned custom middelware, but in Express, which Nest makes use of under the hood, we also have built-in middelwares such as express.json([options]), the built-in application level and router level: express.Router(), and third-party middlewares such as cookie-parser.
Adding Middleware to our Application:
I added another Entity to Amplication's sample app, 'Shipment' (link to the PR that was made by Amplication). Say our app uses some shipment providers that expect specific headers as a part of the request, otherwise, the request is denied. We can use a custom middelware to extract the desired request header from 'req.headers', If the header exists we can continue to the route handler, otherwise we throw an error.
import { BadRequestException, Injectable, NestMiddleware } from '@nestjs/common'
import { Request, Response, NextFunction } from 'express'

@Injectable()
export class ValidateShipmentMiddleware implements NestMiddleware {
  use(req: Request, res: Response, next: NextFunction) {
    const { ShipmentNumber } = req.headers
    if (!ShipmentNumber) {
      throw new BadRequestException('No ShipmentNumber provided')
    }

    next()
  }
}
Applying the middleware in ShipmentModule and excluding the DELETE routes, meaning that for delete action we don't need to pass the 'ShipmentNumber' header.
import { MiddlewareConsumer, Module, NestModule, RequestMethod } from '@nestjs/common'
import { ShipmentModuleBase } from './base/shipment.module.base'
import { ShipmentService } from './shipment.service'
import { ShipmentController } from './shipment.controller'
import { ShipmentResolver } from './shipment.resolver'
import { ValidateShipmentMiddleware } from '../middlewares/validate-shipment.middleware'

@Module({
  imports: [ShipmentModuleBase],
  controllers: [ShipmentController],
  providers: [ShipmentService, ShipmentResolver],
  exports: [ShipmentService],
})
export class ShipmentModule implements NestModule {
  configure(consumer: MiddlewareConsumer) {
    consumer
      .apply(ValidateShipmentMiddleware)
      .exclude({ path: '/api/shipments/:id', method: RequestMethod.DELETE })
      .forRoutes(ShipmentController)
  }
}
ArgumentsHost and ExecutionContext:
For the next 3 components of the request lifecycle (guards, pipes and interceptors) we need to understand what ArgumentsHost and ExecutionContext are.
ArgumentsHost and ExecutionContext are utility classes that provide information about the current execution context. Application contexts could be: Nest HTTP server-based, microservices and WebSockets application contexts.
ArgumentsHost class:
Provides methods, typcally refered to as a host parameter. Used for retrieving the arguments that were passed to a handler with the appropriate context.
For example, the catch() method of an exception filter is called with an ArgumentsHostinstance.
@Catch(HttpException)
export class HttpExceptionFilter implements ExceptionFilter {
  catch(exception: HttpException, host: ArgumentsHost) {}
ArgumentsHost acts as an abstraction over a handler's arguments.
When using '@nestjs/platform-express', meaning HTTP server application:
host.getType() === 'http'
the host object encapsulates Express's request and response objects and the next function into an array [request, response, next]. These can be retrieve by the getArgs() method:
const [req, res, next] = host.getArgs()
And we can also retrieve a particular argument by index using the getArgByIndex() method:
const request = host.getArgByIndex(0)
For GraphQL applications, the host object contains the [root, args, context, info] array.
ExecutionContext class:
Extends ArgumentsHos, thus, it provides additional details about the exection process, such as the class (type, not instance) and the handler. It typcally refered as a ctx parameter.
const methodKey = ctx.getHandler().name // create
const className = ctx.getClass().name // SomeController
The canActivate() method of a guard and the intercept() method of an interceptor are methods that have access to the ExecutionContext instance.
// interceptor
@Injectable()
export class LoggingInterceptor implements NestInterceptor {
  intercept(ctx: ExecutionContext, next: CallHandler): Observable<any> {}

// guard
@Injectable()
export class AuthGuard implements CanActivate {
  canActivate(ctx: ExecutionContext): boolean | Promise<boolean> | Observable<boolean> {}
As opposed to guards, pipes and interceptors, middlewares are unaware of the execution context.
Guards
Executed AFTER each middleware, but BEFORE any interceptors and pipes.
Guard's responsibility is to determine whether a given request will be handled by the route handler or not, depending on conditions present at run-time, that are often referred to as authorization like: permissions / roles / ACLs (access controls), etc.
Implementation
Guard is a class annotated by @Injectable decorator and and implements the CanActivate interface, which takes the ExecutionContext as an argument.
import { Injectable, CanActivate, ExecutionContext } from '@nestjs/common'
import { Observable } from 'rxjs'

@Injectable()
export class OhMyGuard implements CanActivate {
  canActivate(ctx: ExecutionContext): boolean | Promise<boolean> | Observable<boolean> {
    // do something with the context
  }
}
Application
Guards can be applied to the controller-scoped / method-scoped / global-scoped level.
Contorller Scope:
@Controller('lions')
@UseGuards(OhMyGuard)
export class LionsController {}
Method Scope:
@UseGuards(OhMyGuard)
function findSimba() {}
Global Scope:
- Instantiate the guard:
// main.ts
const app = await NestFactory.create(AppModule)
app.useGlobalGuards(new OhMyGuard())
- Use of dependency injection:
// app.module.ts
import { Module } from '@nestjs/common'
import { APP_GUARD } from '@nestjs/core'

@Module({
  providers: [
    {
      provide: APP_GUARD,
      useClass: OhMyGuard,
    },
  ],
})
export class AppModule {}
Guards in Amplication:
Amplication uses AuthGuard (DefaultAuthGuard) and ACGuard for managing authorization and permissions respectively.
import * as common from '@nestjs/common'
import * as nestAccessControl from 'nest-access-control'
import * as defaultAuthGuard from '../../auth/defaultAuth.guard'

@common.UseGuards(defaultAuthGuard.DefaultAuthGuard, nestAccessControl.ACGuard)
export class ProductControllerBase {}
The code above indicates that all of the methods in the Product controller are protected and we need to be authenticated and have specific permissions to get back a response.
But what if we want certain methods to be available without authentication / authorization and permissions?
You can have a look at the following PR where I set findMany() and findOne() methods of the Product entity to be public, with the help of the @Public decorator.
The @Public decorator is a custom decorator that was generated by Amplication for us:
// public.decorator.ts
import { applyDecorators, SetMetadata } from '@nestjs/common'

export const IS_PUBLIC_KEY = 'isPublic'

const PublicAuthMiddleware = SetMetadata(IS_PUBLIC_KEY, true)
const PublicAuthSwagger = SetMetadata('swagger/apiSecurity', ['isPublic'])

export const Public = () => applyDecorators(PublicAuthMiddleware, PublicAuthSwagger)
And used in the DefaultAuthGuard:
import { Observable } from 'rxjs'
import { ExecutionContext, Injectable } from '@nestjs/common'
import { Reflector } from '@nestjs/core'
import { IS_PUBLIC_KEY } from '../decorators/public.decorator'
import { JwtAuthGuard } from './jwt/jwtAuth.guard'

@Injectable()
export class DefaultAuthGuard extends JwtAuthGuard {
  constructor(private readonly reflector: Reflector) {
    super()
  }

  canActivate(context: ExecutionContext): boolean | Promise<boolean> | Observable<any> {
    const isPublic = this.reflector.get<boolean>(IS_PUBLIC_KEY, context.getHandler())

    if (isPublic) {
      return true
    }

    return super.canActivate(context)
  }
}
Do you remember the ExecutionContext? I hope you do 😌
With the help of ExecutionContext we are able to access references to both the current class and handler method. This gives us the opportunity to access the metadata set through the @SetMetadata() decorator from within guards or interceptors.
The @SetMetadata() decorator provides the ability to attach custom metadata to route handlers. Then, we can access this metadata from within our class to make certain decisions. In the example above (of DefaultAuthGuard class) we use the Reflector to access the metadata we have in the '@Public' decorator. Reflector takes the key of the metadata, and the handler (using context.getHandler() that the canActivate() method of the guard give us access to). In our example it returns a boolean value and if isPublic evaluates to true, authentication will not be performed for the route handler decorated with the @Public() decorator.

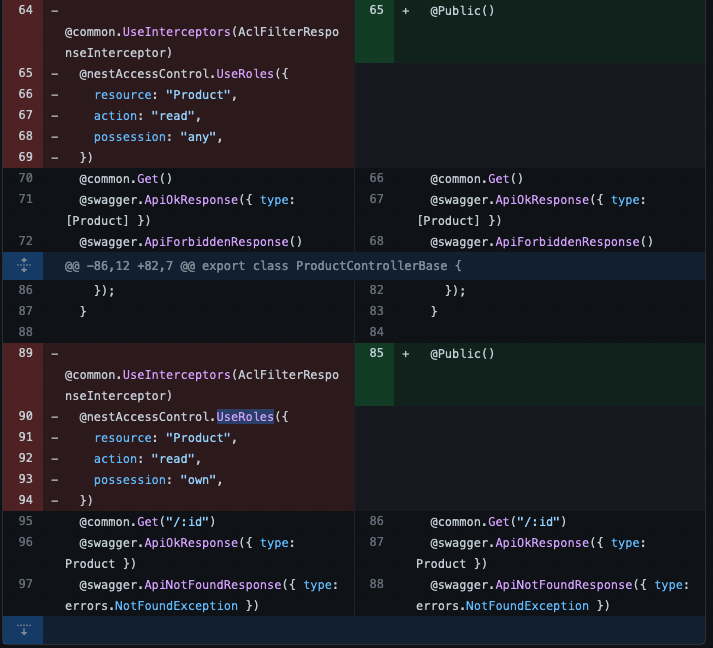
Regarding the ACGuard, this is handled by the amplication/data-service-generation package. When the @Public() decorator is added to the AST (public permission was set in the UI), the @UseRoles() is removed from the AST (as well as the interceptor that we will talk about later), therefore it doesn't get generated above the route handler.
As a result, these routes handler are public and don't ask for authentication and authorization at all.
Interceptors
Can be executed BEFORE and AFTER the route handler and perform useful actions such as: binding extra logic, transform the returned result, transfom exception, extend and even override the function behavior depending on specific conditions.
Implementation
Interceptors are classes annotated with the @Injectable() decorator, which implements the NestInterceptor interface, that has a method called intercept(). This method wraps the request/response stream (that's why you may implement custom logic both before and after the execution of the final route handler) and takes 2 arguments:
- context -
ExecutionContextinterface that inherits fromArgumentsHost. - next -
CallHandlerinterface that implements thehandle()method which returns anObservableand is used to invoke the route handler. If we don't call thehandle()method, the route handler will not be executed.
import { Injectable, NestInterceptor, ExecutionContext, CallHandler } from '@nestjs/common';
import { Observable } from 'rxjs';
import { tap } from 'rxjs/operators';

@Injectable()
export class MyInterceptor implements NestInterceptor {
  intercept(context: ExecutionContext, next: CallHandler): Observable<any> {
    console.log('I Am Running Before...');

    return next
      .handle()
      .pipe(
        tap(() => console.log(`I Am Running After...)),
        map(result => ({transfomedResult: result})),
        catchError(err => throwError(() => new BadGatewayException())),
      );
  }
}
The code we write before the handle() method is executed before the route handler logic is run and returns the results, The code we write after the handle() method is executed after the route handler returns the results and can log something / manipulate the result / throw exceptions (with the help of RxJS as the handle() method returns and Observable).
Application
Like pipes and guards, interceptors can be controller-scoped, method-scoped, or global-scoped. On the controller-scoped, method-scoped approaches, we can pass more than one interceptor.
Controller Scope@UseInterceptors(MyInterceptor)
export class TimonAndPumbaController {}
Method Scope:
@UseInterceptors(MyInterceptor)
@Get(':id')
async findOne(@Param('id') id: string) {
  return this.TimonAndPumbaService.findOne(id);
}
Globa Scope:
- Instantiate the interceptor:
// main.ts
const app = await NestFactory.create(AppModule)
app.useGlobalInterceptors(new MyInterceptor())
- Use of dependency injection:
// app.module.ts

import { Module } from '@nestjs/common'
import { APP_INTERCEPTOR } from '@nestjs/core'

@Module({
  providers: [
    {
      provide: APP_INTERCEPTOR,
      useClass: MyInterceptor,
    },
  ],
})
export class AppModule {}
Interceptors in Amplication
Amplication has (at the time this post is written) 2 method scoped interceptors
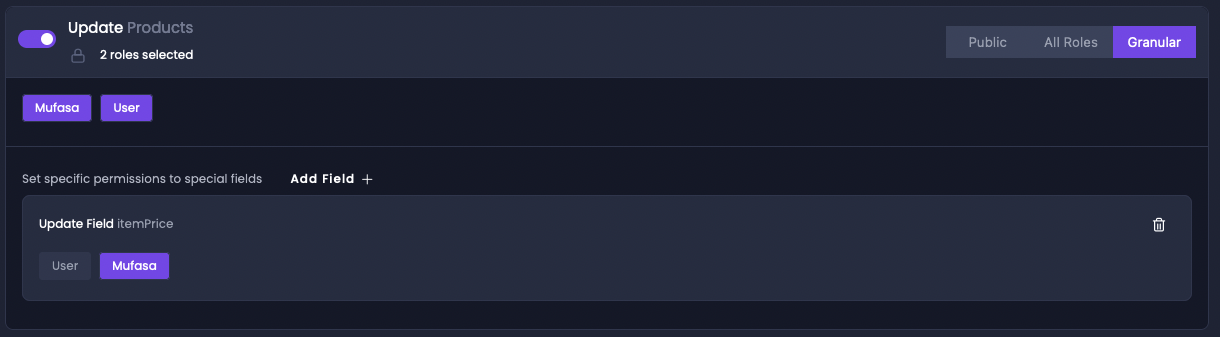
- AclValidateRequestInterceptor - validate the request object. If it consists of attributes that the user's role doens't have permissions for, it throws an error.
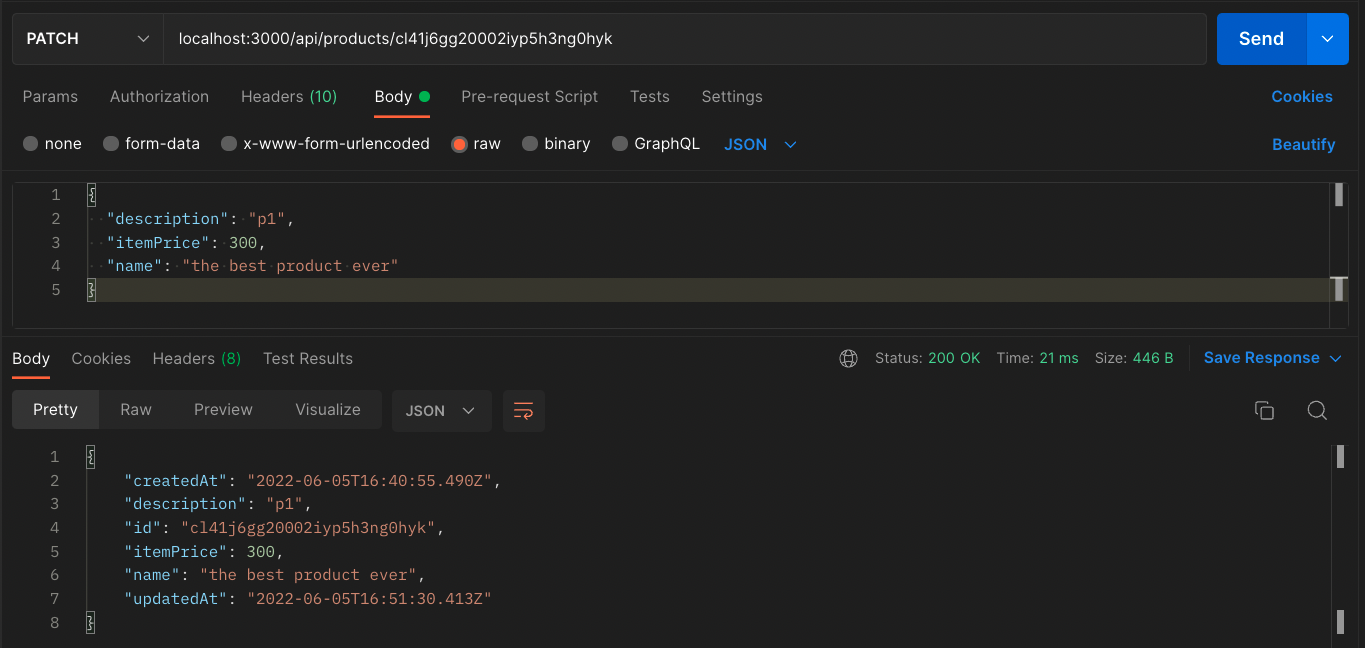
To explain the functionality of this interceptor, I added a new role: 'Mufasa' 🦁 and in the permissions tab of the 'Product' Entity I set that only users with the role 'Mufasa' can update the field 'itemPrice'. (you can see it on this PR).

// product.controller.base.ts
@common.UseInterceptors(AclValidateRequestInterceptor)
  @nestAccessControl.UseRoles({
    resource: "Product",
    action: "update",
    possession: "any",
  })
  @common.Patch("/:id")
  @swagger.ApiOkResponse({ type: Product })
  @swagger.ApiNotFoundResponse({ type: errors.NotFoundException })
  @swagger.ApiForbiddenResponse({ type: errors.ForbiddenException })
  async update(
    @common.Param() params: ProductWhereUniqueInput,
    @common.Body() data: ProductUpdateInput
  ): Promise<Product | null> {
    // logic of update product which I didn't copy to here
  }
Trying to update the 'itemPrice' property of a product while you are logged in as a user with the role 'User' will get us the following result:

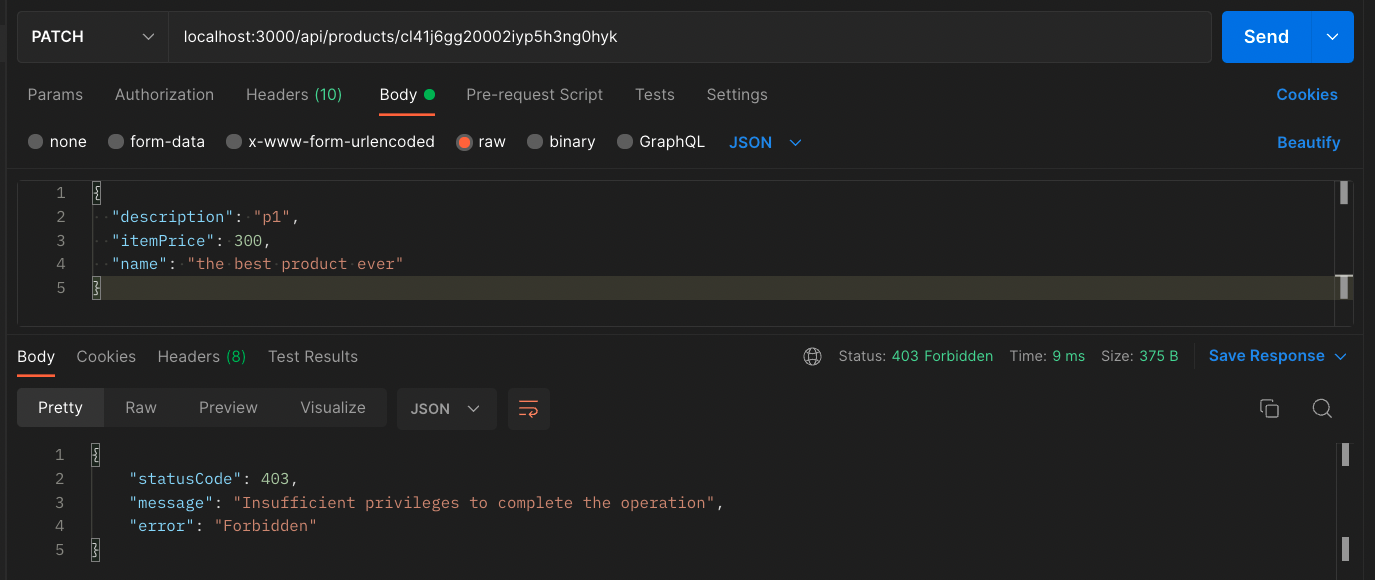
If we exclude the 'itemPrice' field from the request object, we will be able to perform the request successfully.
But in the case of a user with the role 'Mufasa', we will succeed in updating the 'itemPrice' field of the Product entity:

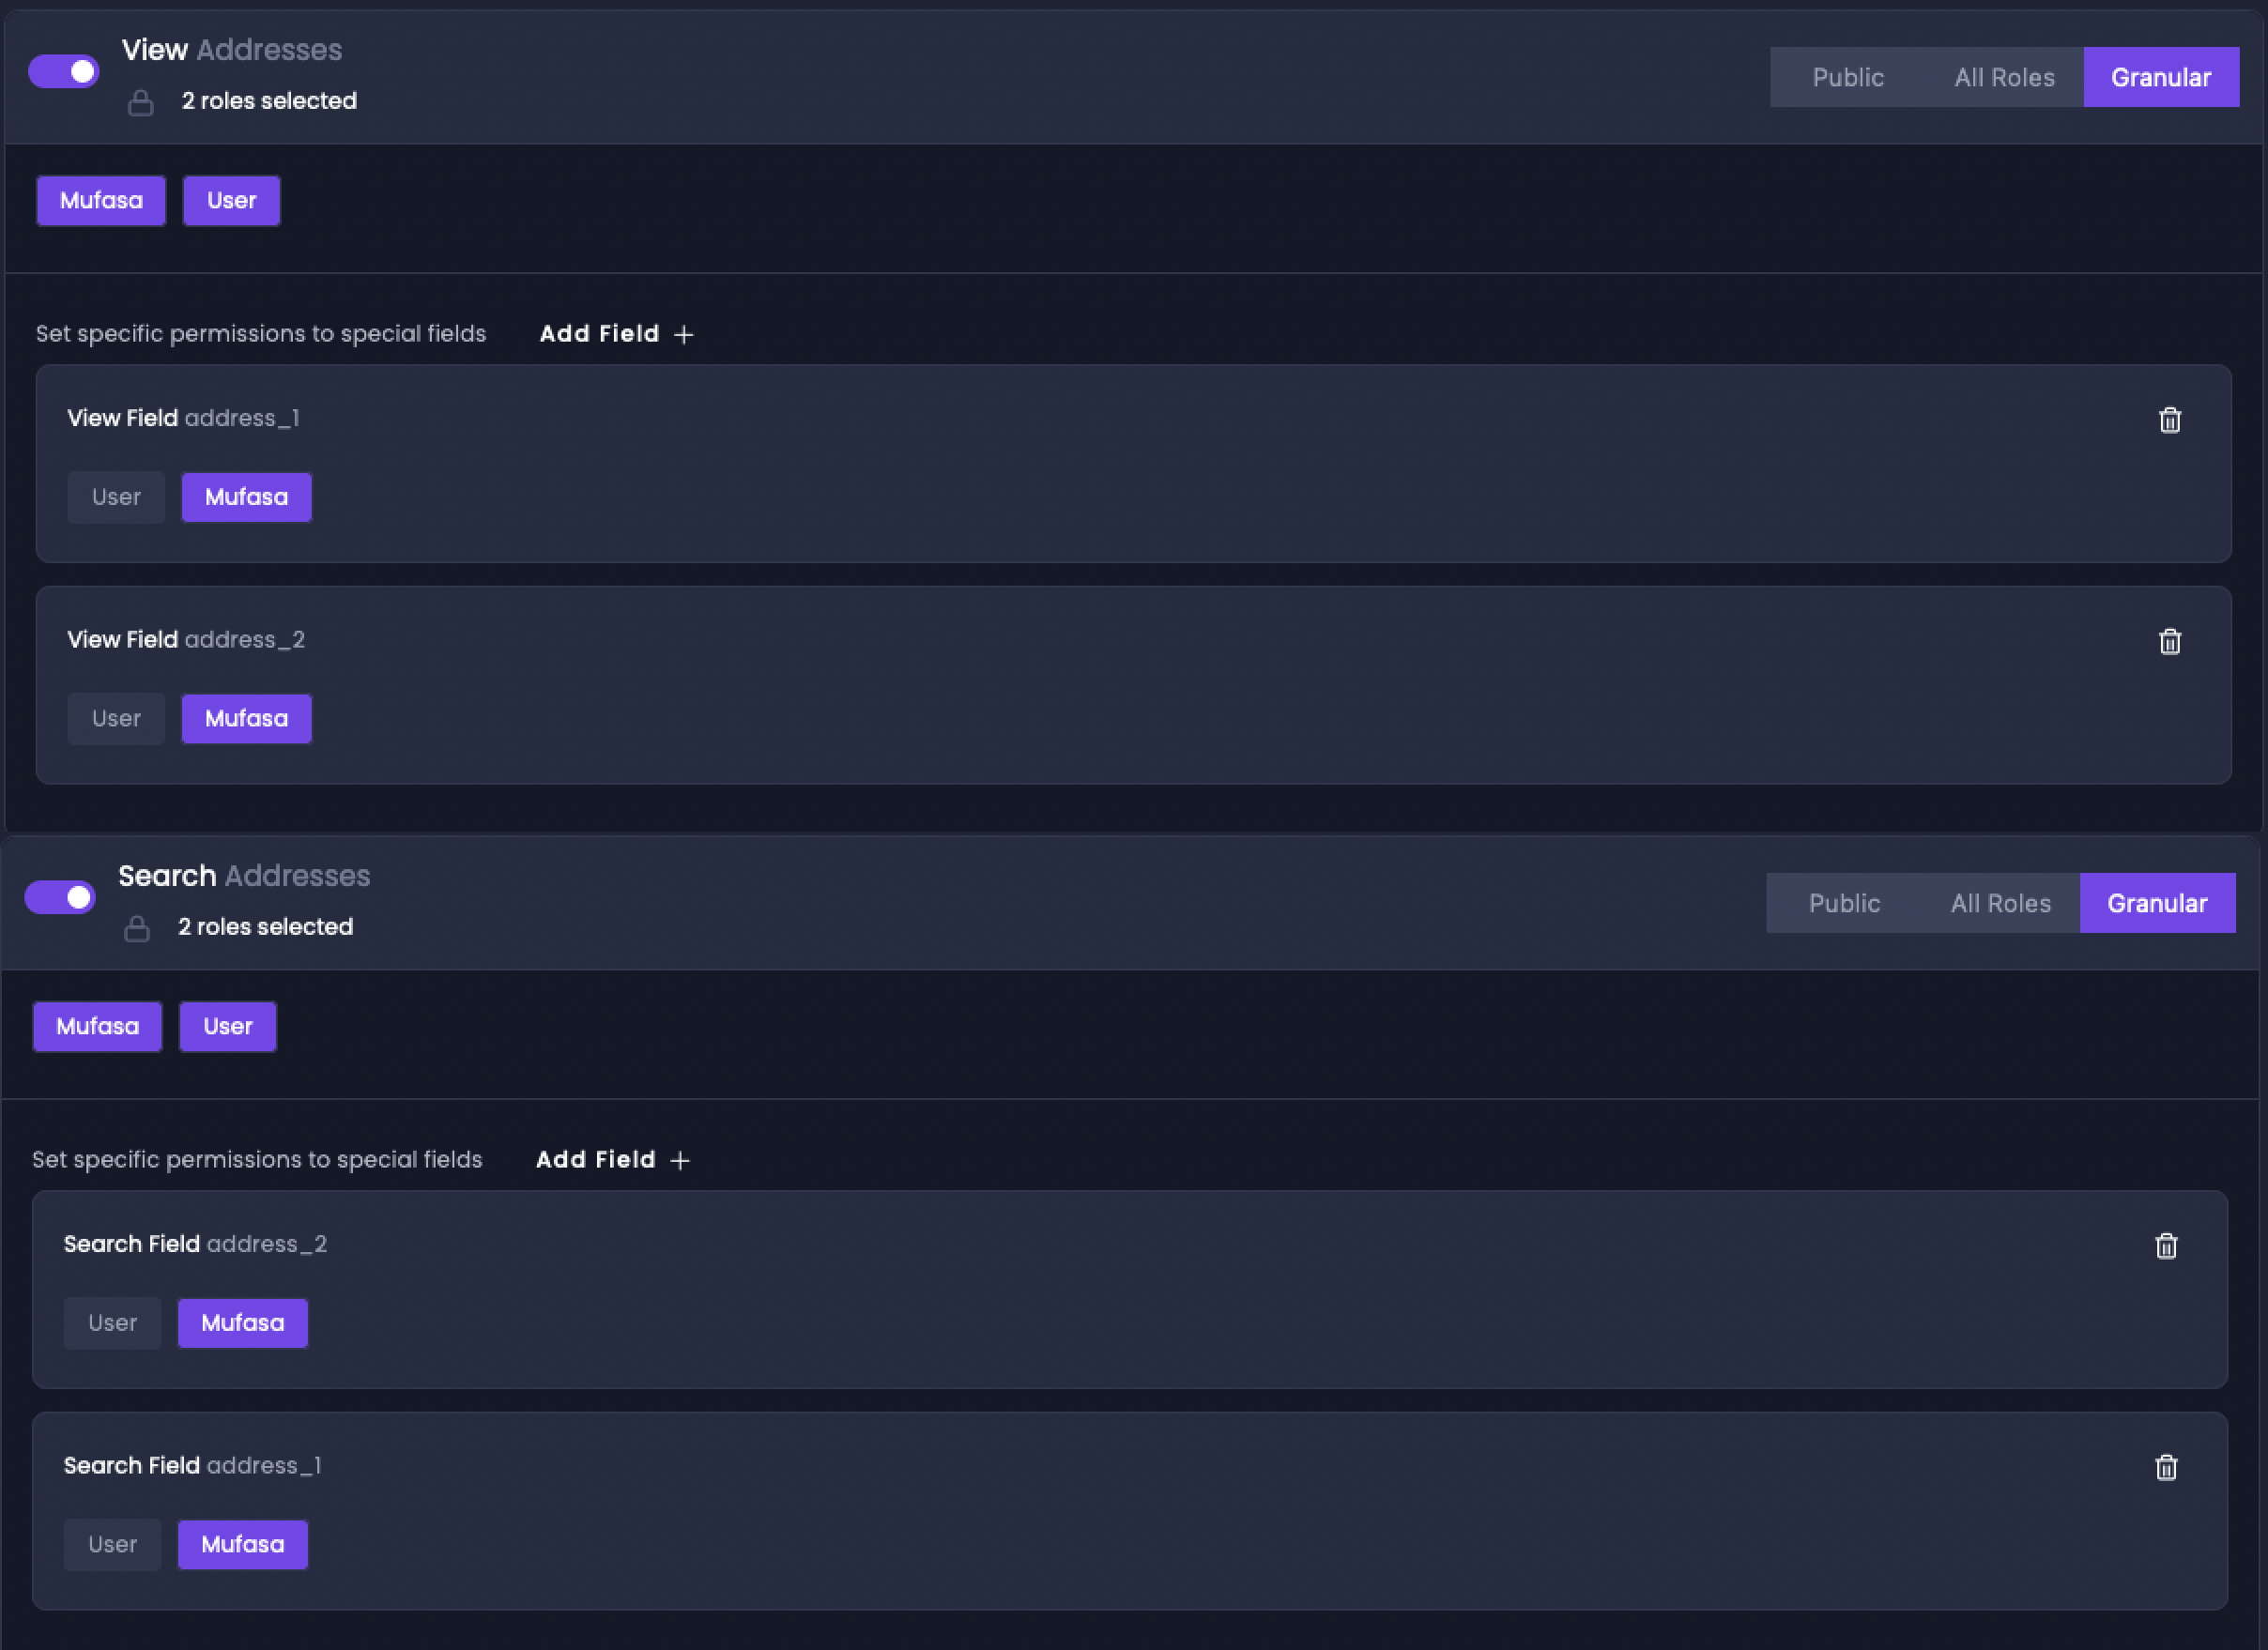
- AclFilterResponseInterceptor - filter out the attributes (properties) that a user with a specific role doesn't have permission to view/search from the response object.
To explain the functionality of these interceptors, I made another change, this time on the 'Customer' entity. I set that view and search operations for 'Adderess 1' and 'Adderess 2' fields are allowed only to users with the role 'Mufasa'. (you can see it on this PR).

// address.controller.base.ts
@common.UseInterceptors(AclFilterResponseInterceptor)
  @nestAccessControl.UseRoles({
    resource: "Address",
    action: "read",
    possession: "any",
  })
  @common.Get()
  @swagger.ApiOkResponse({ type: [Address] })
  @swagger.ApiForbiddenResponse()
  @ApiNestedQuery(AddressFindManyArgs)
  async findMany(@common.Req() request: Request): Promise<Address[]> {
    // logic of find many Addresses which I didn't copy to here
  }
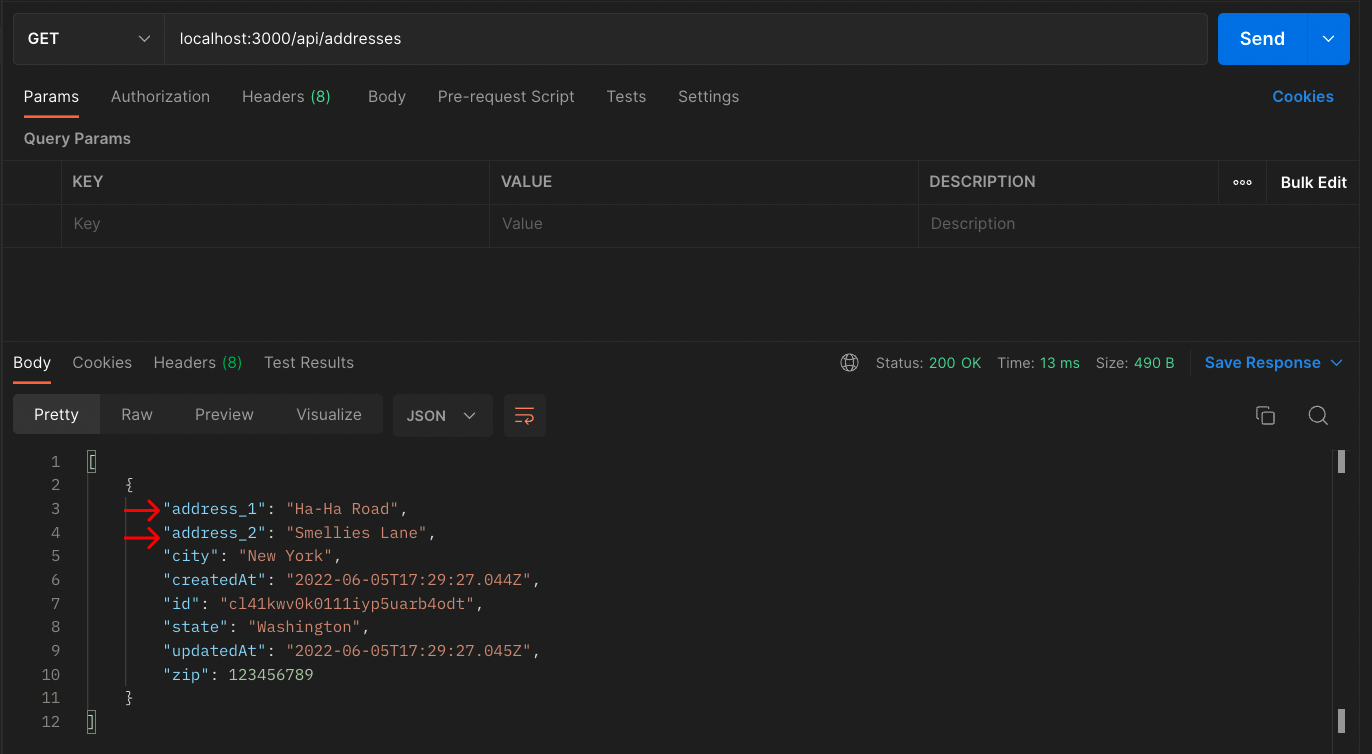
Now, let's try to find all the addresses while we are logged in as 'User' role

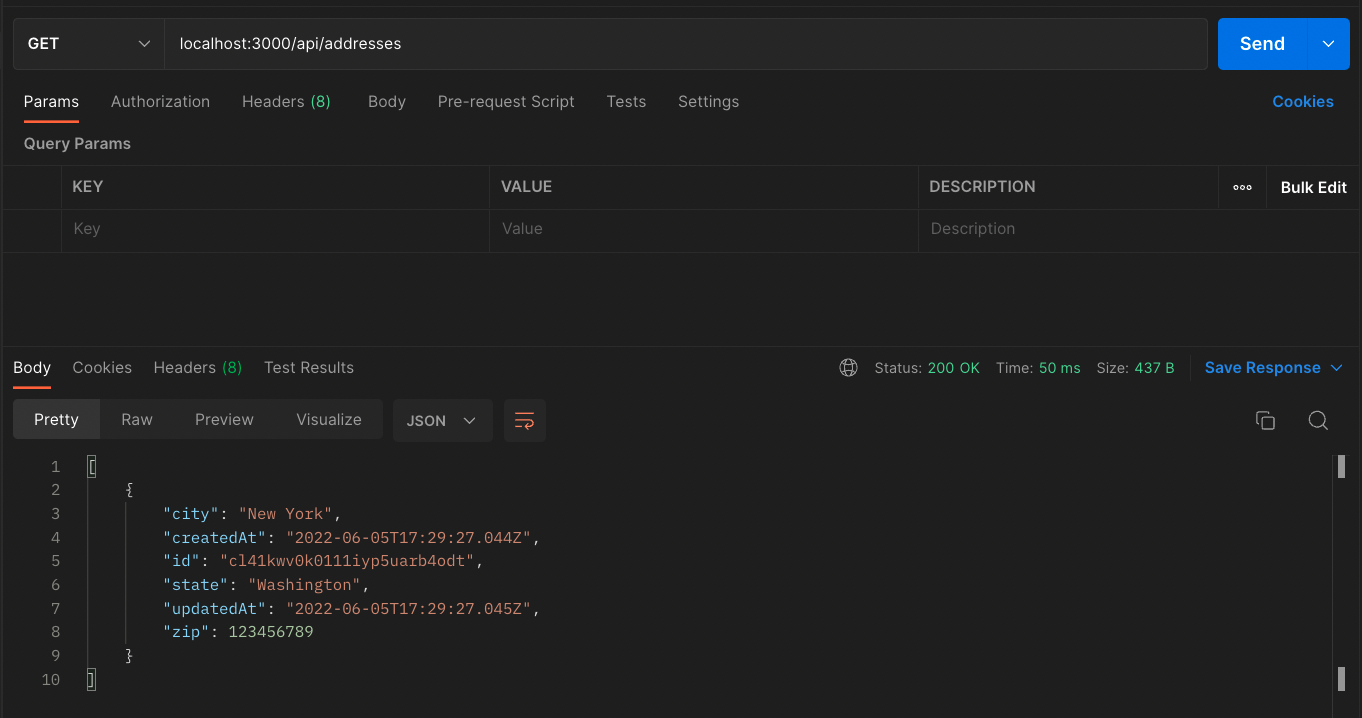
We are not getting 'Address 1' and 'Address 2' fields, but if we log in as 'Mufasa', we will get these properties back.

Another type of interceptor that Amplication uses is a global scoped interceptor for logging:
// app.module.ts
@Module({
  imports: [
    // code I didn't copy
  ],
  controllers: [],
  providers: [
    {
      provide: APP_INTERCEPTOR,
      scope: Scope.REQUEST,
      useClass: MorganInterceptor('combined'),
    },
  ],
})
export class AppModule {}

Pipes
Activated right BEFORE the route handler is invoked.
Pipes have two use cases:
- transformation - transform the input data to the desired form
- validation - check the validity of the input data and throw an exception when the data is invalid
Nest comes with some built-in pipes, such as: ParseIntPipe, ParseFloatPipe, ParseBoolPipe, ParseEnumPipe and more.
Implementation
Pipes are classes annotated with the @Injectable() decorator, that implements the PipeTransform interface.
Let's build a very useful custom transformation pipe that concats 'Hakuna Matata' to every input data that it gets.
import { PipeTransform, Injectable, ArgumentMetadata } from '@nestjs/common'

@Injectable()
export class HakunaMatataPipe implements PipeTransform {
  transform(value: any, metadata: ArgumentMetadata) {
    return `${value} Hakuna Matata`
  }
}
The transform() method comes from the PipeTransform interface and it takes two parameters:
- value - the currently processed method argument (before the route handler)
- metadata - the currently processed method argument's metadata (type, metatype, data)
Application
Method Level: binding the instance of the pipe at the method parameter level (a particular route handler) and making sure it runs before the method is called:
@Get(':id')
async findOne(@Param('id', HakunaMatataPipe) id: string) {
  return this.TimonAndPumbaService.findOne(id);
}
Global pipes:
- Instantiate the pipe:
// main.ts
const app = await NestFactory.create(AppModule)
app.useGlobalPipes(new ValidationPipe())
- Use of dependency injection:
// app.module.ts
import { Module } from '@nestjs/common'
import { APP_PIPE } from '@nestjs/core'

@Module({
  providers: [
    {
      provide: APP_PIPE,
      useClass: ValidationPipe,
    },
  ],
})
export class AppModule {}
Pipes in Amplication:
Amplication uses a kind of validation pipes called 'Schema Based Validation'. These pipes ensure that the request body object is valid before attempting to run the service method.
Taking for example the create() method of the CusotmerControllerBase class:
@common.UseInterceptors(AclValidateRequestInterceptor)
  @nestAccessControl.UseRoles({
    resource: "Customer",
    action: "create",
    possession: "any",
  })
  @common.Post()
  @swagger.ApiCreatedResponse({ type: Customer })
  @swagger.ApiForbiddenResponse({ type: errors.ForbiddenException })
  // binding the validation pipe
  async create(@common.Body() data: CustomerCreateInput): Promise<Customer> {
    return await this.service.create({
      data: {
        ...data,
        address: data.address
          ? {
              connect: data.address,
            }
          : undefined,
      },
      // what we want to get back:
      select: {
        address: {
          select: {
            id: true,
          },
        },
        createdAt: true,
        email: true,
        firstName: true,
        id: true,
        lastName: true,
        phone: true,
        updatedAt: true,
      },
    });
  }
The request body is annotated by the @Body() param decorator and set its type to CustomerCreateInput, which is basically a DTO. If the user sends in the request body a property that this DTO doesn't have, an error will be thrown before it gets to the service.
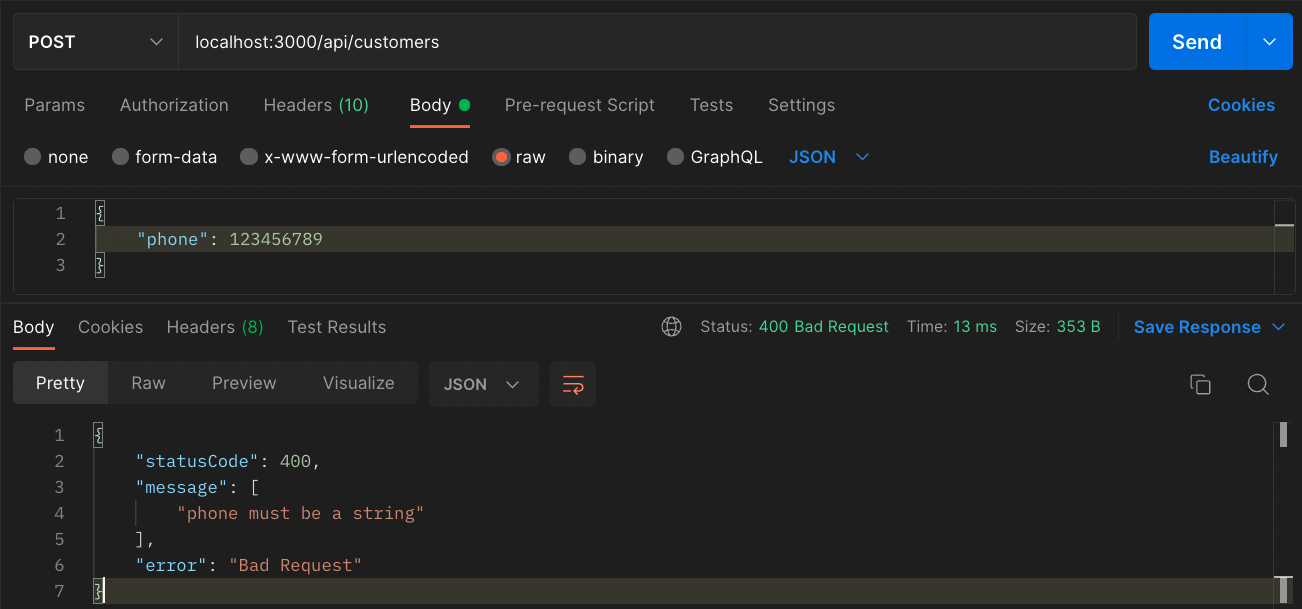
There is also use of class-validator to validate the properties of the request body. For example, The following code is a part of the CustomerCreateInput DTO. The 'phone' property's type of 'Customer' entity is String.
import { IsOptional, IsString } from 'class-validator'

@InputType()
export class CustomerCreateInput {
  @ApiProperty({
    required: false,
    type: String,
  })
  @IsString()
  @IsOptional()
  @Field(() => String, {
    nullable: true,
  })
  phone?: string | null
}
If the user send a different type, class-validator function comes to an action and an error will be thrown.

Exception Filters
Responsible for processing all unhandled exceptions across an application. When an exception is not handled by your application code, it is caught by Nest's built-in global exception filter layer, which then automatically sends an appropriate user-friendly response.
One of the built-in exception is the HttpException and it used for typical HTTP REST/GraphQL API based applications. HttpException is a class, and therfore we can extend it and make our own custom exceptions. The constructor of HttpException takes 2 arguments:
- response - defines the JSON response body (usually consists of
statusCodeandmessage). Can be string/object - status - defines the HTTP status code
@Get()
async findAll() {
  throw new HttpException('Forbidden', HttpStatus.FORBIDDEN);
}

// the response the cient get:
{
  "statusCode": 403,
  "message": "Forbidden"
}
We can override the message or the entire JSON response body, and Nest will serialize the object and return it as the JSON response body.
@Get()
async findAll() {
  throw new HttpException({
    status: HttpStatus.FORBIDDEN,
    error: 'This is a custom message',
  }, HttpStatus.FORBIDDEN);
}

// the response the cient get:
{
  "status": 403,
  "error": "This is a custom message"
}
Implementation
Exception filters should implement the generic ExceptionFilter<T> interface. This requires you to provide the catch(exception: T, host: ArgumentsHost) method with its indicated signature.
The @Catch(HttpException) decorator binds the required metadata to the exception filter, telling Nest that this particular filter is looking for exceptions of type HttpException and nothing else. The @Catch() decorator may take a single parameter, or a comma-separated list. This lets you set up the filter for several types of exceptions at once.
import { ExceptionFilter, Catch, ArgumentsHost, HttpException } from '@nestjs/common'
import { Request, Response } from 'express'

@Catch(HttpException)
export class HttpExceptionFilter implements ExceptionFilter {
  catch(exception: HttpException, host: ArgumentsHost) {
    const ctx = host.switchToHttp()
    const response = ctx.getResponse<Response>()
    const request = ctx.getRequest<Request>()
    const status = exception.getStatus()

    response.status(status).json({
      statusCode: status,
      timestamp: new Date().toISOString(),
      path: request.url,
    })
  }
}
Application
Exception filters can be scoped at different levels: method-scoped, controller-scoped, or global-scoped. @UseFilters decorator can take a single filter instance, or a comma-separated list of filter instances.
Method Scope:
- create the instance of HttpExceptionFilter
@Post()
@UseFilters(new HttpExceptionFilter())
async create(@Body() createLionDto: CreateLioinDto) {
  throw new ForbiddenException();
}
- pass the class and leave the responsibility for instantiation to the framework (enabling dependency injection).
@Post()
@UseFilters(HttpExceptionFilter)
async create(@Body() createLionDto: CreateLioinDto) {
  throw new ForbiddenException();
}
Controller Scope:
@UseFilters(new HttpExceptionFilter())
export class LionsController {}
Global Scope:
- Instantiate the filter:
// main.ts
const app = await NestFactory.create(AppModule)
app.useGlobalFilters(new HttpExceptionFilter())
- Use of dependency injection:
// app.module.ts
import { Module } from '@nestjs/common'
import { APP_FILTER } from '@nestjs/core'

@Module({
  providers: [
    {
      provide: APP_FILTER,
      useClass: HttpExceptionFilter,
    },
  ],
})
export class AppModule {}
Exception Filters in Amplication
Amplication uses the build in HTTP exceptions (BadRequestException, ForbiddenException, NotFoundException).
But, just for fun, I added an exception filter to our application. Exactly the one from the implementation example (and to be honest - from Nest documentation) and used it in the UserController at the create method.
You can see all the changes I have made on this commit
  @common.Post()
  @common.UseFilters(HttpExceptionFilter)
  async create(@common.Body() data: UserCreateInput): Promise<User> {}
First I search if a user with the requested username already exits, and if so - I throw the built-in exception error: ConflictException
const user = await this.findOne({ username: data.username })
if (user) {
  throw new ConflictException()
}
You can argue that the HttpExceptionFilter part is troublesome and I can just throw the ConflictException, but sometimes you want to get more data on your exception (path, timestamp) and this way you can throw any built-in error from Nest, and get the same structure of exception. In my opinion it's nicer.
{
  "statusCode": 409,
  "timestamp": "2022-06-05T20:17:22.923Z",
  "path": "/api/users"
}
Me, thinking to myself every time my post is getting too long:


Final Note:
In this commit I fixed the way I added the @swagger.ApiHeader({name:"shipmentnumber"}) in the 'Middlewares in Amplication' section, and the UserWhereUniqueInput DTO from the 'Exception Filters in Amplication' section. For now in Amplication, the files at the 'base' folder are overriden every time you make a change in the dashboard and submit a PR. Therefore, the best practice is to add your custom code for modules, services and controller at the root level of the entity's folder. In case of DTOs (UserWhereUniqueInputs that contains not only id, but also username) I chose to create a new folder for it (dtos) but you can do whaterver you want as long as it outside of the base folder and not override the base DTO.
Conclusions:
- Cartoon villains speak in foreign accents (Scar) 👺
- Knowing our application's lifecycle, how and where to use its components, helps us build better code 🚀
- Amplication is a very cool open source project, and I am being impartial about it 😏
- I may consider to start writing shorter posts ✂️